Thursday, March 2, 2017

Sunday, October 11, 2015

Something to Dye for...

The following is a list of dyestuffs and mordants that I've collected over the past 25-odd years; some of them I've tried, some I haven't.  If the information is incorrect, or you get a spectacularly different result, please post in the comments :-)


Tuesday, May 12, 2015

Ceiling Wax...

Ellie's getting married soon and wanted to use wax seals on the wedding invitations, so we set out in search for some sealing wax and eventually found some (although the clerk initially thought we'd asked for something for the ceiling…).

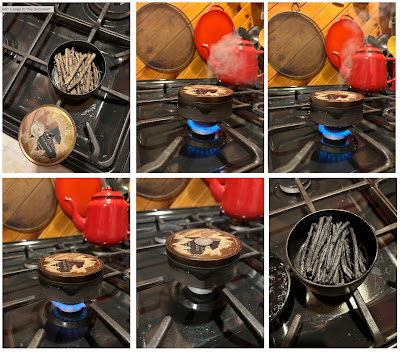
I grabbed a spoon and a small lamp as, in the good old days, this was how one melted sealing wax; and I didn't trust the newfangled wick thingy in the middle of the wax stick.  We melted about a spoonful and then tried to pour it onto the paper - it was a lot thicker than I remembered and most of it clung to the spoon like a preteen girl to a One Direction photo; so we thought we'd try lighting the wick and melting it that way (and just put up with the inevitable traces of carbon through the wax >.<)

Napalm.  Burning plastic falling from the heavens.  Setting fire to the paper.  Repeatedly.  We peeled off the small amount that we'd spooned onto the paper previously and found it flexible (WTF??) and very unlike the old-style sealing wax - it didn't even smell right LOL!  Tried breaking a bit off the stick to melt in the spoon and found that the stick was soft and bendy… Bloody plastic!  With bloody wax on the outside!
FFS.

We'll make some ourselves.

How hard can it be?

>.<


From memory, sealing wax was originally (at least, in the twelfth/thirteenth centuries) a  mixture of beeswax and resin but I wasn't sure of the ratio.  We made some up 1:1 and then deserted the greasy mess for the internet and tried to find a hint as to how much beeswax to how much resin to use, but all the recipes were for post-1600 wax which included shellac and, frequently, vegetable turpentine.

Eventually we settled into experimental mode, and tried a 2:1 (resin to beeswax, still too soft and oily), a 3:1 (looked too oily), 4:1…  and the 3:1 set and was just right >.< so added more wax to the 4:1 mix to bring it back to 3:1.  The resin was a yellow/orange colour, and the beeswax was stuff I'd scored from a hive and then rendered quite a few times (and was the colour of putty) so even without any dye added the sealing wax looked like caramel.  The only powdered dye we had in the house was an antique and venerable pot of Dylon 'Autumn Glory' (which was a lovely 1970s burnt orange and probably dated from about then, too) so we mixed a little of that in, reheated the wax for the fourth or fifth time, and ended up with something that looked like poor-quality chocolate… I think we overcooked it.  A lot.


We tested it with the seal, figured we had the proportions right, made a solemn vow to get some red powder dye, then spent half an hour cleaning up the kitchen…  But we now have 'real' (if poo-coloured) sealing wax :-)

Sunday, May 10, 2015

The past year

The past 10 months has been a production line of making Things Medieval - research, sourcing materials, putting it all together; sewing interspersed with woodwork, embroidery spelled by leatherwork… you get the picture.

We were very fortunate in our op-shopping to come across a variety of crockery that would pass as 'period' - there's always room for improvement and it'll be upgraded as we go, but it's enough to start off with :-)


I was very excited to find some pewter spoons, and with a little adjustment with a file I now have the first set of period metal spoons I've had in 20-odd years of re-enacting (sad, isn't it?).


Decorations from old costumes were recycled - another thing to upgrade once we have time...


Some things were made from scratch - my tunic is a silk brocade, a copy of a twelfth century Sicilian brocade; the collar pattern comes from a bowl of the period and the cuff pattern from a column head.  They're worked in Opus Anglicanum-style laid-and-couched gold thread, embroidered, and beaded with carnelian, citrine, malachite, turquoise, coral, and pearls (mainly freshwater, but grandmother's Mikimoto cultured pearls are in there, too).

One of the silliest things I ever heard was a long-standing re-enactor informing a newcomer that the pearls on her costume were "the wrong size"…  Tell that to the oysters ;-)


We've even got together a collection of toys for the kids - documentation for toys in our period is a little bit thin on the ground, so we've had to rely on what came before and what came directly after the early 13th century.

An interesting find in Big W - the original earring is gold ;-)


It occurs to me that we've spent much more timing making things than photographing them - as it should be :-)

It's been a long time...

Spoiler warning: semi-biographical and very little historical content ;-)

I didn't realise how long.  Ellie had a daughter in late 2010,  Dad passed away in 2011 :-( ; Sam and Colin came back from Canada, had a baby, and returned there in 2012.  Ellie, Will and the kids moved up from Tassie in 2013.  Nat, Rob and I pootled along with Oltramar as a tentful of static displays, which suited us well enough as Three People Does Not Make An Encampment ;-)

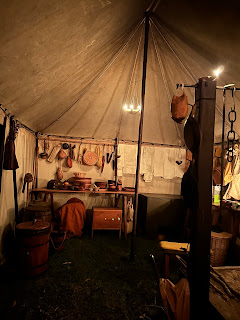
Ellie, the kids and I went along to History Alive 2014 and Abbey 2014 as members of the public - an odd experience for a re-enactor! - and The Family sat down afterwards and decided that Oltramar needed a little remodelling…  The 25-thousand-word-essay-in-an-ugly-canvas-cover had been an interesting experiment - no one had done it before, I had a good amount of public interest, and it was heartening to see other groups start to use written displays; but there were now enough of us to have a functioning encampment.  Ellie and I sat down and sketched out what we thought we'd want in an encampment, and what social aspect of medieval life we'd like to display.  We decided to stay in Cyprus, and to enhance the visual aspect of our display (let alone making research easier) we decided to portray an 'upper-crust' extended family, travelling somewhere…   Rob and Will were re-enacting with The Templars,  who generously invited us to be their 'pilgrims' that they were escorting to Jerusalem in 1229.  Having the 'where', the 'why' and the 'who', we now had to work out the 'how' - we needed another tent (for Ellie, Will and the kids), mine and Nat's costumes needed upgrading and Ellie and Will needed costumes from scratch (they'd been doing Viking re-enactment in Tassie); Rob's costumes had worn out, and the kids had none at all.  Our plates and cups and serving gear were all very… middle class ;-) and the hangings needed upgrading, the chairs repainting, another small table here, a pavilion to sit under… and we had 10 months until HA2015.

Ellie and I drew up a battle plan (fondly known as The Bloody List) and started measuring, sewing, researching, embroidering and op-shopping.  We enlisted the help of Nat, Will and Rob to do odd tasks they were suited for (and had time for - there's not a lot of that when one is a teacher) but by and large we made building the new group our 'job' (in between coping with our respective bipolar disorders and Ellie being a Mum).

Now we're just under a month out from our first show (in our new format!) and The Bloody List has been whittled down to something (hopefully) manageable.

And I really should look back over the last year of photos, and blog about it ;-)

Monday, February 15, 2010

6-and-a-bit weeks to go...

Yup, Oltramar (minus Dad, who has too much sense ) is heading south in six-and-a-bit weeks to Armidale to partake in the NEMAS Easter Gathering. This involves a lot of planning and creating, so that everything goes smoothly on the weekend.

There's a large number of things to take into account: How are we getting down there? No problem - the ute, a couple of cars (and hopefully another ute heading north from Tassie with our southern members :-) ) What are we living in once we get there? We have a tent (4.8m x 3.2m) which will house 4 of us, and have to make another (3m x 3m) for the other two; the Tassie folk are making a Viking tent (3m x 4m-ish) and will be bringing that.

How will the tents be furnished? As they're white canvas it's necessary to line the walls with hangings to prevent the dreaded 'puppet-show' - the legend goes that one re-enactment event, long ago, a couple headed into their tent to consummate their fleshy desires, and neglected to blow out the candle, thus giving the entire company ... a puppet show. Of course, hanging also keep out the cold, and make the tent look pretty :-) So we have to come up with 28m of period-looking wall hangings...

Carpets make living in a tent more pleasant (and warmer); period-looking rugs are not hard to come by, especially the small ones (which are a tripping hazard); one can go overboard, though - I spent my Rudd-money one two $399 ones from Ikea... but they almost cover the entire tent floor.

What is everyone sleeping in (keeping in mind that it's bloody cold at night)? I have The Medieval Rope Bed (complete with flock and feather mattresses, mink coverlet and a couple of blankets), but the others have opted for The Pallet - traditionally a sack stuffed with straw, but in our case blow-up mattresses with a heavy cotton cover. On top of these will be blankets, sleeping bags covered with more blankets, and a couple of large flokati rugs (pretty much the same thing as the traditional 'rya' rugs that were woven as coverlets in the time, but with a higher percentage of goat hair). Pillows will need to have 'period' slips if they are likely to be seen...

What are we wearing? Well, a generic version of 'Early Medieval' - tunics, gowns, shirtes, chemises, pants for the guys, woolen cloaks... This is the sticking point - we have enough costumes for doing a show, but not to last us for four days (even though none of them will be fighting and getting hot and stinky). So, my sewing room is a veritable production line at the moment, which ends in the living room where all the handsewing and embroidery is done to the dulcet tones of Stargate, M*A*S*H, and The Simpsons... SOOO much sewing!!!

As well as all this, there are stools, a trestle table, olive oil lamps, musical instruments, spinning equipment and a host of other incidentals that all have to be checked, repaired, cleaned, and made ready.

What are we eating? Well, for breakfast (Saturday, Sunday and Monday) there will be a choice of bread, butter, eggs, bacon, or porridge; lunch (Friday, Saturday and Sunday) will be an assortment of bread, cheeses, ham, salami, apples, dolmades, olives... Dinner (Friday and Saturday, as NEMAS is feasting us on the Sunday night) will be a stew and a roast. 3 full days' meals for 9 people... Most of it (veges, bread, dried foods) can travel down in a sack; the rest, believe it or not, will pack into 2 medium-sized eskis and will be frozen solid before we leave (including the cartons of milk and the apple juice concentrate); that way we need to get minimal ice over the weekend as the nearest service station is a good 15 minutes drive away.

And what are we cooking it with? Pots, cauldrons, pans, fire irons, wrought iron tripod, wooden spoons, pottery bowls, chopping boards, cooking knives, and so on and so forth... The entire kitchen has to be 'medievalised' and the squeezed into the back of the ute with all the other 'essential' stuff. Then we have to make sure everyone has eating gear - a plate, bowl, cup, spoon and knife each - most of which can be picked up at op-shops, some (like the knives) can be made.

In the end, it's a lot of work and preparation to make sure everything runs smoothly once we get down there. It's a five-hour drive from home and way to far to go back if we've forgotten something (which always happens - one year I remembered my bow and forgot to bring arrows D'oh!); so lengthy lists are made, checked off, compared with what we took last time, patitioned into 'have' and 'make'... and I'm going to be spending the next 6 weeks sewing!

Wednesday, July 15, 2009

Cardweaving - Longest.Post.Ever.

The cardweaving kits sold quite well at Abbey, so I thought I'd put the booklet up on the blog. The kit was primarily designed to teach the basics of cardweaving , from which you can move on to your own patterns or something more advanced like letters or figures (using other sites available on the net!). As you can see, the kit contained everything to get going straight away: cards cut out of cardboard, with holes punched in then and corners rounded off, yarn for warp and weft, a shuttle (also made of cardboard), a comb (to keep the width correct) and a 150 cm length of tape to use as a belt. If you're going to use these instructions to learn to cardweave, you'll have to get/make up all those things yourself - read through the 'booklet' here first so you get lengths and sizes right.

The cover of the booklet is a fabric made of cardwoven strips - half a dozen more and I'll have enough to turn it into a shoulder-bag!

This booklet is copyright - it tok me quite a while to get it all together and I'd appreciate it if you email me if you intend to use it in any other way other than to learn how to cardweave yourself.


Cardweaving is a very ancient form of weaving (dating back, at least, to the ancient Egyptians) which was extremely popular throughout the medieval period. It is also known as tablet weaving. Some historical references are : 1) the set of weaving cards found in the Viking age Oseberg ship burial, 2) remnants of card woven braid from an archaeological dig in London dated to the twelfth century, and 3) a late fourteenth century painting of a woman using a card loom. The commentary to the London dig suggests that the large amount of cardweaving found there indicates that it was a very common form of decoration for clothing etc. There are still some parts of the world that use card weaving for saddle girths (the strap under the horse’s belly) and belts or straps.

This is a quick and easy way of producing decorative, handmade braid. You can use wool, linen, or silk yarn, or embroidery thread, depending on the result you want. The basic tools needed are just a set of cards and the yarn, although there are a few other tools that make the process easier. This booklet is designed to teach you to card weave, from nothing to a very basic piece of braid; and I’ll add some more complicated patterns at the end.

The Cards
You will only need 15 cards to do the simple exercise in this booklet; but you will find more cards are necessary for more complex designs. The cards should be made out of a stiff material - traditionally bone, horn, ivory or wood was used, but stiff cardboard is fine for the beginner (after all, there’s no point in spending hours making bone cards only to discover you hate weaving!). The cards should be roughly 6cm square, with a hole in each of the rounded corners (see diagram at right). A hole through the middle is handy for binding the cards together when you’re not working so that they don’t get out of order. If you’re using something stiffer than cardboard it may be necessary to sand the edges and the holes so that the yarn isn’t cut by sharp or rough edges.


Threading
We will be using 8-ply wool for this exercise, as it is easy to come by and less fiddly than finer yarns. Cardweaving designs come out best in contrasting colours (e.g. green and yellow; red & blue; purple, orange and white; red, yellow and black etc) - we’ll use a ‘light’, a ‘medium’ and a ‘dark’ colour.


First, we need a threading pattern. This is, very simply, a grid which denotes the number of cards on one axis and the number of holes on the other axis. This pattern uses the fifteen cards you have, and each card has four holes, so the pattern grid will be 15 x 4, and we will need 60 threads (i.e. 15 x 4 = 60).


As you can see from the diagrams above, you start with a piece of graph paper and draw half your pattern. This is because the basic principle of card weaving is to turn the cards forward four quarter turns (whereupon you’ll weave what you’ve drawn) and then back four quarter turns (whereupon you weave the other half of the design - a mirror image). If we took it that the dark squares were blue, the medium squares were red and the light squares were yellow, then what we would end up with is a braid with a blue stripe along each side, and between them a line of lozenges that are red on the outside with blue centres, on a yellow background. If you examine the diagram and count the coloured squares, you will notice that there are 26 dark ones, 20 medium ones and 14 light ones. These are the numbers of threads of each colour that you will be using.

You next need to prepare your yarn. The yarn supplied in the kit with this booklet has already been measured, cut and tied. Given that the exercise you are doing is just to produce a sample of weaving, the pieces of yarn are only about a metre long. Because it is necessary to fasten the ends of the weaving to something, I find it easier to loop the threads (i.e. cut each thread to be 2m long and fold them in half giving a loop at one end). I have found that allowing 2m of yarn gives 1.5m of weaving - you need to allow the extra 50cm for knots at either end, for an unwoven length in which to move the cards, and the actual weaving takes up a bit, too.


The diagram below indicates how the pattern actually relates to the cards.


Card number 5 has been circled on the pattern and the diagram on the right shows how the individual threads are placed. Please pay particular note that the holes in the card are numbered in a clockwise direction (not left-to-right).


The image above is the threading diagram (D) - the / and \ symbols indicate how each card is to be threaded (i.e. \ indicates that the card is to be threaded from top to bottom - diagram A, and / indicates from bottom to top - diagram B. Threading follows the pattern - note where a series of \ marks are, the pattern goes the same way (e.g. cards 4-7). To distinguish which side of the card is which, I put a circle around hole 1 on one side of the card - this side, where the circle is, is now the top side of the card. I also mark the side of the card (see diagram C) so that when I am weaving I can keep track of the turns forwards and backwards

Tie the looped end of the threads you have to something solid (I use a nail hammered into a shelf) so that the loose ends hang down. Start threading up the cards, as indicated in the threading diagram, starting with card number 1. Thread it as indicated (take four ‘dark’ threads from the bunch and thread them through the card, top to bottom) and then lay it down face up. Thread card 2 and lay it face up on top of card 1. Make sure that the holes in each card are on top of each other - i.e. hole 1 is over hole 1, hole 2 is over hole 2, etc. Continue to do this until all the cards are threaded.


Now take the cards in one hand (so they don’t fall out of order) and all the loose ends of yarn in the other hand, and pull the threads tight against whatever you’ve fastened them to. You will notice that some of the threads are looser than others. It is important if you want the pattern to come out evenly that all the threads have as even tension as possible. As we are using wool, which has a certain elasticity, it will not be that difficult to achieve. Still keeping a hold on the loose ends, run the cards up the threads towards the fastened end. You will see which threads are loose. Keeping a good hold on the cards, let go off the threads and comb your fingers through them, pulling them tight, until you can see no more loose threads. Take hold of all the loose ends and pull tight and then run the cards back down towards you. You will doubtless find more loose threads, so repeat the ‘combing’ process. The loose ends of the threads are likely to be fairly tangled but all this to-and-fro-ing with the cards and the combing will eventually untangle everything. When the warp (the proper name for the bunch of threads you’re holding) is evenly tensioned and untangled to your satisfaction, tie the loose ends in a knot (keeping the even tension) and run a piece of twine (about 30cm) through the warp in front of the knot. This twine will fasten the weaving to your belt as you maintain tension on your weaving by leaning back away from what you have fastened it to. Finally, take the small comb and, moving the cards about 15cm up the warp away from you, place the comb in front of the cards so that its teeth are collecting the warp on the top and bottom and move it towards you up to the knot. This spaces the warp and ensures that the weaving will start off an even width.


To start weaving, take your shuttle (see the picture at the bottom of this page) and wrap around it the same colour yarn that will be on the outsides of your design (in this case, ‘dark’). If you use a different colour it will show at the edges - you may like to experiment with this effect later. Have about 25cm of yarn trailing from the shuttle and weave it through the shed leaving a 15cm ‘tail’ (see diagram 8). Use the shuttle to press (‘beat’) the yarn (properly called the weft) up against the comb, and then take the body of cards in both hands and turn them a quarter-turn away from you. Pass the weft back through the shed, beat the weft back, and turn the cards another quarter-turn away from you. Repeat this twice more (You will now have made four quarter-turns away from you), and the black stripe on the sides of the cards should all be up the top again. This indicates it’s time to change direction. Pass the weft back through the shed, beat the weft back, and turn the cards a quarter-turn towards you. Repeat these steps until you see the black stripe on the sides of the cards on top again. You have just completed one repeat of the pattern. Now, continue until you run out of weft. When that happens, just overlap the ends of the old weft thread and the new one (having wound some more onto your shuttle), and continue weaving. When weaving pieces longer than a metre, after a while you will notice that the cards are getting out of reach - pull all the cards along the warp until they are against the weaving, untie the weaving from your belt and make a slip-knot in it, pass the twine through the loop in the slip-knot, tie it back on to your belt and continue.

When you are coming to the end of the warp, and the cards don’t really have enough room to turn anymore, you’ve nearly finished. Cut off the weft leaving a 15cm ‘tail’ and cut through the warp threads at both ends, next to the knots. Now you have a choice - you can sew the weft ends into the weaving, or plait the warp (and weft) ends, or thread beads on them - it really depends on what you intend the weaving for. Obviously if it is to be braid on a garment, then you’ll sew the ends in, but for a belt you should use your creativity.

SHUTTLES are basically a tool to hold the weft, pass it through the warp, and in the case of cardweaving, beat back the weft. The shape is not important as long as the job is done - I find the shuttle shape below more convenient to use, and of a size of about 8x3cm.


Below are a few basic patterns. As you can see by the pattern on the far right, they can be combined to form a wider pattern. Theoretically it is possible to weave a 'belt' a metre wide but I wouldn't advise it unless you have a regular cloth loom to support the weaving. You will probably find that 5-7cm wide is within the range of comfortably being able to move the cards, but it is a matter of experimenting and finding your limits (i.e. how far your hands will stretch...). Rather than weaving a single belt a metre wide, it is easier to weave a series of belts around 6cm wide and then sew them together to form fabric. Another thing to try is to experiment with turning the cards more than 4 forwards-4 backwards. Try 8 or 12 forwards and backwards and see how it changes the pattern. Be sure to look on the net or in your local library for books on card- or tablet-weaving, as they will provide you with new and more complicated patterns and techniques.